Thursday, 11 April 2013

Easy Photo Viewer and Scroller using Jquery


This tutorial teaches you how to create an easy or a very simple but powerful photo viewer and scroller application using Jquery.

This is a very simple application that uses the hide() and fadeIn() functions to display and scroll the images or contents in a gallery and the programs are written in a way that any one can easily understand and customize without much effort and with good programming code comments to ease usability.

To fully understand what is happening or how the application works, please read the comments written in the scripts properly where necessary.

There is no special form of configuration needed to install the system on your server. Just download the script, upload and extract the zipped folder to your server and you are done.


Comment System Using Ajax, Jquery and PHP - Updated v5.0


This tutorial teaches you how to build a Simple but powerful and User Friendly Comment System whereby the users of your websites can easily post their comments or replies on your updates or other information on your website using Ajax, Jquery and PHP.

The comment system uses cookie to store users information on their first time to post a comment, reply to a posted comment or like a comment and these stored information are later saved in the database as the login information for your users.

For a user to leave or post a comment, reply to a posted comment or like a comment, the system will prompt the user to enter his or her Full name and Email Address for identification purpose.

The system uses the email addresses submitted by users at their first time to post a comment, reply to a posted comment or like a comment to identify them whenever they try to perform any further action in the future and as such, users email addresses are unique within the system.

Below are some features of the comment system:

(1) Good in security
(2) Users can add their avatar or desired photo for commenting purpose
(3) Enlarge users avatar or photos when clicked on them
(4) Reply to posted comments
(5) Like both comments and replies posted
(6) Email notification for new Replies and Likes to users concerned
(7) Nice display of Confirmation Box for comment deletion and logout
(8) Proper validation for empty fields
(9) Comments are displayed based on pages where they are posted
(10) No long URLs or contents that extends through the comments box area.
(11) Load more Comments and Replies Button with pagination
(12) Admins can moderate comments by deleting unwanted comments and much more.
This powerful comment system supports all browsers and programming languages used are Ajax, Jquery and PHP.

The script is very easy to understand and customize with good programming code comments to ease usability.


Secure Forgot Password System Using Ajax, Jquery and PHP


This tutorial teaches you how to build a secure forgot password system or a complete login system with the forgot password feature without refreshing your website page using Ajax, Jquery and PHP.

This system is secure in the sense that, the users of your website have been given the privilege to set their private security questions and answers during their account creation process that they will later use, should they forget or lost their account passwords.

If a user of your website happens to lost or forget his account password, that user does not need to request for a new random generated password sent via his or her email box which is not secure because an attacker can intercept such messages and therefore gain access to the account of your user(s).

What this system does is to allow your users to set their private or secret questions and answers during their account creation so that, if a user forgets his or her password, all the user will do is to come to the login page of your website and click on the forgot password button, the system will then prompt the user to enter his or her account username.

After the user has provided his or her account username and clicks on the submit button, the system will now validate the submitted username to be sure that its valid and gets the secret question associated with the submitted username from the database for the user to answer it.

If the user answers the secret question correctly, access to change the password that is associated with the submitted username account will be given to this user otherwise this user will be denied access.

Users are given 6 chances to enter correct answer for their security questions during their reset password process after which the system will lock a user out for 30 minutes, should the user submit wrong security answer up to six times.

The system supports all browsers and the scripts are written in a way that any one can easily understand and customize with good programming code comments to ease usability.
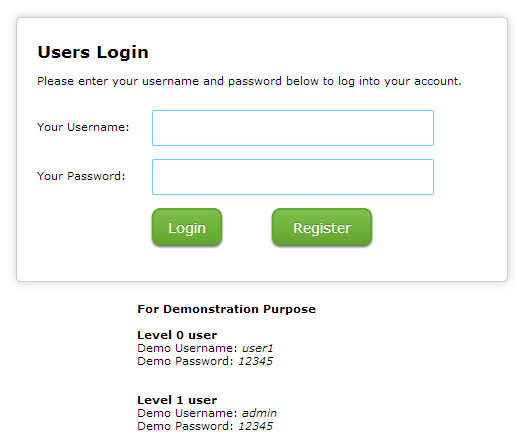


Secured Users Access Level System using PHP and Mysql


This tutorial teaches you how to build a secure user access level system using PHP and Mysql.

There are two user access levels created for this system at the moment but you can add as many user levels as you wish depending on your needs.

The two user access levels created for this system at the moment are as follows:

(1) Level Zero: This is the default level meant for all ordinary and newly registered users in the system. When a user newly registers, the access level for that user is set to zero in the database users table.
(2) Level One: This is the default level meant for the Administrator of the system. You have to set the access level for any user that you wish to make an administrator for the system to one in the database users table before that user can have the administrative access or privilege to see all the information in the system.

When a user tries to log into the system, the system validates his or her information, checks the database users table for his or her details including his or her access level and displays the appropriate content to the user.

An ordinary user or a user at a lower level in the system does not and can not see what the administrator who is at an upper level in the system sees.

The levels of the users in the system are determined based on the information inserted into the database table for each user.

This is a very simple to understand application that gives you the basics of how to implement this kind of systems with good programming code comments to ease usability.


Tuesday, 5 March 2013

Send Friend Request, Accept or Decline Request using Ajax, Jquery and PHP


This tutorial teaches you how to build a system whereby the users in your system can send friend request to other users in the system, those users who have been sent friend request have the options to accept or decline request sent to them depending on their choice of action using Ajax, Jquery and PHP.

This system works with MySql database and comprises of three tables.

The first table is where the details of the users in the system are stored and retrieved during Sign-up and Login process.
The second table is where the details of the users who are confirmed as friends are stored for friendship purpose.
The third table is where the details of every sent friend request are stored waiting for an acceptance or rejection by the user who the request was sent.

When a user sends a friend request by clicking on the Add as Friend button, this button will automatically change to Request Sent on successful sending of the request with an option to Cancel the sent request in case the user who sent the request wishes to stop the request.

Once a user who has been sent a friend request logs into the system or accesses the system, a notification for the request will be shown to this user from the top of the page with options to Accept the sent request or Decline the request depending on the user's choice of action.

If the user who has been sent a friend request chooses to accept the request, the request will be deleted from the Friends Request table and be stored in the Confirmed Friends table and both the user who sent the request and the user who the request was sent to will now see each other in their friends list.

If a user who has been sent a friend request chooses to decline the request, the request will be deleted from the Friends Request table and that ends the story. No further action is or will be taken.

This is a very simple to understand application that gives you the basics of how to implement this kind of systems with good programming code comments to ease usability.


Click here to view this tutorial


Saturday, 2 March 2013

Upload and Watermark Image Files without Refreshing Page using Ajax and Jquery


This tutorial teaches you how to upload and watermark or stamp image files with your desired content without refreshing your website page using Ajax, Jquery and PHP.

To upload and watermark an image file, simply click on the Attach File button, select the file that you wish to upload and finally click on the submit button and your file will be uploaded, watermarked or stamped and displayed on your screen provided the file is a gif, jpg, jpeg or png image file which are the allowed image files for this demonstration.

The system supports all browsers and the script is very easy to understand and customize with proper programming code comments to ease usability.

No form of configuration is required to use or install the system on your server.

Just open the directory named images which is in the downloaded and extracted directory and change the file named www_dot_vasplus_dot_info.png to your own image file for watermark and that's it.


File System using Ajax, Jquery and PHP v4.0


What is a File System?
A file system is a complete directory structure, including a root directory and any sub-directories and files beneath it.

This tutorial teaches you how to build an advanced File System whereby you can easily upload files and manage all the files on your server without refreshing your website page using Ajax, Jquery and PHP.

This is a very simple to understand application because the system itself is user friendly, all you need to do in order to use the system are properly explained and the scripts are well commented to ease usability.

No configuration is required to install and use the system on your server. All you need to do is to download the script, upload and extract the downloaded folder to your server and you are done to start using the system.

This system is made up of two files and a directory which are as follows: default_system_index.php, default_system_actions.php and a directory named default_system_files that contains the JavaScript Files, a CSS File and the images used in the application.

All other directories and files in the zipped downloaded folder are just example files and directories on your server which has been placed for demonstration purpose.

File System v4.1 is available for sale upon request.