Saturday, 30 November 2013

Change Website Body Background Color Using Ajax, Jquery and PHP

This tutorial teaches you how to design a system where you can easily change the body background color of a website page using Ajax, Jquery and PHP.

This system works with a database which is the location where the background color of the website is saved and later retrieved when needed.

The system takes an inputted color from an input box and checks the database table for an existing website body background color, if a background color already exist in the database, it will update the database table for the website background color with the new color inputted by the user and display an appropriate message to the user which could either be success or failure message depending on the status brought from server - PHP being the server side scripting language.

If a website background color does not already exist in the database, it will insert a new background color as inputted by the user and display an appropriate message to the user which could either be success or failure message depending on the status brought from the server - PHP being the server side scripting language.

This is a very simple to understand application as it has just one database table plus few coding.

The scripts are written in a way that any one can easily understand and customize with good programming code comments to ease usability.


Saturday, 9 November 2013

Login with Facebook Account using PHP

This tutorial teaches you how a create a log in system whereby, the users of your websites can easily log into your websites using their Facebook accounts via Facebook PHP SDK version 3.0

Login with Facebook Account using PHP

Saturday, 2 November 2013

Auto-suggest System using Ajax, Jquery and PHP

This tutorial teaches you how a create a simple but powerful Auto-suggest system where a user can input a desired search term and get immediate result using Ajax, Jquery and PHP.

The system takes an inputted search term by a user from an input box and compares it with the information in the database, if a match or matches is/are found, it displays a total of twelve matches on the screen to the user in ascending order provided the matches are up to twelve otherwise, it displays the total number of matches found.

The user can choose to click on a desired result from the listed results and it will be shown in the input box.

School Management System

The Vasplus School Management System is a complete Web Application that helps to improve the performance and the entire system of Schools, Colleges or Universities all over the world.

This system brings an end to the problem of School Manual Information Recording. With this system, you can easily record and manage all your school data without much effort. Information stored in this system can easily be accessed and used at any point in time.


Wall Script Version 7.0

This amazing script is a user friendly application which is similar to that of Facebook and Google Plus with more advanced features and the script is very easy to install and customize.

Thursday, 31 October 2013

Online Examination System

This tutorial teaches you how to build a simple but powerful Online Examination System (OES) where you as an organization or a body can easily add subjects offered by your school or topics of exams or test to be written in your organization to the system, set and add multiple-choice questions and answers with an option for the correct answer that the system can use at the end of the exam or test to mark each question based on subject or topic level, set up time allowed to take an exam or test and add students or candidates for a particular exam or test to the system based on subject or topic level using Ajax, Jquery and PHP.

This system has been designed to ease examination process in schools and organizations.

To write an exam or seat for an exam or test, students or candidates are required to provide their admission or ID number which has already been added to the system by an admin based on subject or topic level for proper verification.

The number of students or candidates added to a particular subject or topic for an exam or test are the ones that will be granted access to seat for that exam.

This way, it can only take the students or candidates who have been assigned to a particular subject or topic to seat for that exam.

Results are generated automatically and displayed to candidates at the end of an exam or test with an option to print the result if deem necessary.

Online Examination System

Saturday, 12 October 2013

News Publishing Blog

This is a paid tutorial and it teaches you how to design a simple but powerful news publishing blog or website where individuals, publishers or celebrities can easily post regular updates from time to time and their blog viewers or readers can read and comment on their updates using Ajax, Jquery and PHP.

What is a News?
A News is an information about recent events or developments.

What is Publishing?
Publishing is the process of production and dissemination of literature, music, or information — the activity of making information available to the general public.

What is a Blog?
A Blog is a frequently updated personal journal chronicling links at a Website, intended for public viewing.

The News Publishing Blog is a web application and a Content Management System that helps you to publish the information about your recent activities, events or developments online.

Some features of this system are as follows:

(1) Posting of regular updates with Images and Videos from Youtube.
(2) Editing of existing updates.
(3) Deleting of unwanted updates.
(4) A powerful Search System.
(5) A Commenting System for blog readers or viewers.
(6) Blog owner or admin of the blog can moderate comments by deleting unwanted comments.
(7) A nice Contact Form with Captcha for contacting the blog owner or the admin of the system.
(8) Blog Readers or Viewers can subscribe by email or via feeds.
(9) The blog owner or the Admin of the blog can Update the entire website information or contents such as Website Name, Email Address for the contact form, Phone Number, Footer Copyright Text and About Us Page contents.

The system supports all browsers and the script is written in a way that any one can easily understand and customize with good programming code comments to ease usability.

Payment is required before you can be able to download this script.

To install the system on your server after you must have paid and downloaded the zipped folder containing the required files, please extract the file to your system then, open the file named README.txt and follow the three installation steps given in that file.

News Publishing Blog

Saturday, 21 September 2013

School Management System

Dear All,

The long awaiting Vasplus School Management System is finally here.

To see and demo the system for yourself, please follow this URL: http://school.vasplus.info/index.php

At the demo website, please click on the "Live Demo" button to see the system in action.

For demo login details, please click on the link that says "Click here for Demo Login Details" at the login page and the login detail box will appear at the right side of that page.

You can start your demonstration by logging in as an admin to see the admin control panel. The same applies to the other users in the system.

After you have logged into the system as an admin, don't forget to click in the search box at the top of the page to see the drop down box with options which is similar to the new Facebook design as promised.

The same applies when you login in as a student, staff or registrar but the icons with options differs.

If you need any information about the system or as regards buying the application, you can always contact us via the demo website.

Thank You!
Vasplus Team.


Sunday, 15 September 2013

Shopping Cart Version 5.0

This is a paid tutorial and it teaches you how to design a simple but powerful Shopping Cart or an Online Store where you can sale any type of product and fully manage all the activities in the system on a single page without the page refreshing using Ajax, Jquery and PHP.

This system works with MySql Database and there are two type of users in the system and they are User Admin and Normal User.

User Admin is the user with the role "admin" in the database table and the Normal User is the user with the role "normal" in the database table.

The system allows users or customers to view items or products which are available for sale in your store.
Before a user can add an item or product that he or she wishes to buy to cart, the system will prompt for log in with an option to sign-up in one simple step provided the user or customer does not already have an account in the system.

When a user or customer newly registers, the role of that user or customer is set to "normal" by default in the users table. 

Now, lets assume you are the admin or owner of this system and wishes to change the role of a registered user or customer to an admin, all you will do is to edit the users table and change the role of the user from "normal" to "admin" and the system will begin to regard such user as an admin when the user logs into the system.

Upon successfully log in, the system will take the user back to the item that he or she previously wanted to add to cart and also present the user with a link to edit his or her account.

After a user or customer has added a desired item or product to cart, the system will show a moving notification basket for the added item or product. The user or customer who added the item to cart can click on the moving shopping cart basket to see all the items he or she has added to cart with an option to Remove un-wanted item, Checkout or Empty his or her cart.

Users or customers can always login to see their purchased history which could also be referred as Purchased Items in the system, they can as well update their account details.

The administrator of the system can view and manege all the registered users in the system, he or she can view and manage all the purchased items in the system, he or she can also add new items or products to the shopping cart or online store for sale.

Items or products in the store can be browsed by categories with a pagination for easy viewing or browsing.

The system has a nice website design as seen at the demo page and supports all browsers and the scripts are written in a way that any one can easily understand and customize with good programming code comments to ease usability.

Payment is required before you can be able to download this script.

To install the system on your server after you must have paid and downloaded the zipped folder containing the required files, please extract the file to your system then, open the file named README.txt and follow the three installation steps given in that file.

Shopping Cart Version 5.0


Chat Application Version 6.0


This is paid tutorial and it teaches you how to build a simple but powerful cross-browser chat system where users can be able to chat both publicly and privately with each other using Ajax, Jquery and PHP.

Some amazing features of the chat system are shown below:

(1) Sign-up and Log-in System with Account Verification.
(2) Forgot Password System with Security Question and Answer.
(3) Send New Messages by "Pressing Enter Key" on Computer Keyboard or "Button".
(4) Displaying of users Online.
(5) View Online User information such as Age, Gender, Location, About Me before chating with the user.
(6) Chat Publicly or Privately with Users Online.
(7) The system will set current user or friend communicating with to selected even when the page is reloaded - similar to Facebook Messaging System.
(8) File attachments with File Identification.
(9) Download attached files with photo enlargement - similar to Facebook Messaging System.
(10) Hide and show send message button - similar to Facebook Messaging System.
(11) Delete messages without page refresh.
(12) Nice confirmation box for message deletion and log out, etc.

The system supports all browsers and the script is written in a way that any one can easily understand and customize with good programming code comments to ease usability.

Payment is required before you can be able to download this script.

To install the system on your server after you must have paid and downloaded the zipped folder containing the required files, please extract the file to your system then, open the file named README.txt and follow the three installation steps given in that file.

Chat Application Version 6.0

Chat Application Version 6.0

Click here to view this tutorial


Friday, 16 August 2013

How to Set, Read and Delete Cookie using JavaScript.

This tutorial helps and teaches you how to Set, Read and Delete Cookie using JavaScript.

What is a cookie?

A cookie is simply a variable that your website page can store on or retrieve from the user's computer.

The idea is that the next time the user arrives at your website page, the value of the cookie can be read by the website page, and then used for a desired purpose.

<script type="text/javascript">
  
// Function to set a Cookie function vpb_set_cookie(cookie_namecookie_valuetotal_days_allowed)  
{     
    if (total_days_allowed != "")      
    {         
       var vpb_date = new Date();
          vpb_date.setTime(vpb_date.getTime() + (total_days_allowed*24*60*60*1000));
 
        var vpb_expires ";  expires="+vpb_date.toGMTString();     
     }     
     else { var vpb_expires ""}                

document.cookie cookie_name+"="+cookie_value+vpb_expires+";  path=/";

// Function to read a Cookie 
function vpb_read_cookie(cookie_name)  { 

    var vpb_cookie_name cookie_name "=";     var split_cookie_name document.cookie.split('; ');     
    for( var 0;  split_cookie_name.length;  i++ )      
    {
        var vpb_split_cookie_name split_cookie_name[i];         

       while ( vpb_split_cookie_name.charAt(0)==' ' )         
        {             vpb_split_cookie_name vpb_split_cookie_name.substring(1,vpb_split_cookie_name.length);             
             if ( vpb_split_cookie_name.indexOf(vpb_cookie_name) == )        

return vpb_split_cookie_name.substring(vpb_cookie_name.length,vpb_split_cookie_name.length);         
              }     
          }     
          return null

// Function to delete a Cookie 
function vpb_delete_cookie(cookie_name)  {     

    vpb_set_cookie(cookie_name"", -1); 

//This is how you should use the above function to set the cookie with 10 days to keep the cookie active before it expires. vpb_set_cookie('fullname','Victor Olu',10); 

//This is how you should use the above function to delete your cookie - The cookie will be deleted if you uncomment the below code. 
//vpb_delete_cookie('fullname'); 

//This is how you should use the above function to read or get your cookie after setting it. 
alertvpb_read_cookie('fullname') ); 
</script>

Click here to view this tutorial

Saturday, 3 August 2013

Set Website To and From Maintenance Mode using Ajax, Jquery and PHP

This tutorial helps and teaches you how to design a nice system where you can set your websites to maintenance mode so as to carry out your maintenance activities and also remove your websites from maintenance mode when you are done with your maintenance work using Ajax, Jquery and PHP.

The system works with MYSQL Database and uses a simple and nice looking switch that triggers two radio buttons within a div for turning On and Off your websites mode for maintenance work.

If JavaScript is disabled on your browser, the script will just display the two radio buttons with their labels which are On and Off.

The word "On" means to set the website to maintenance mode and "Off" means to remove the website from maintenance mode.

When you set your website to maintenance mode by clicking on the On option of the switch or radio button, the system will auto take the IP Address of your computer being the Administrator of your website and save it in the database along with your website status which is maintenance mode so as to allow you alone being the administrator of the system to access any part of the website to carry out your maintenance work while any other user or visitor that visits the website is redirected to a page set with nice information telling the user or visitor that the website is currently under maintenance and would be right back in a while.

I am sure you guys understand what i am actually talking about, Good!

To configure the system to work on all the pages of your website so as to check when you have set your website to maintenance mode and redirect your users or visitors appropriately to your nicely designed maintenance mode page, simply include the file named "vpb_maintenance_mode.php" on all your website pages as done in the page named "website_test_page.php".

Then, follow the steps taken in the index.php file which is assumed to be your demo admin panel to add the codes in this file to your main website admin panel page to have this feature for your websites.

The steps taken in the index.php file is very simply, to move the codes in this file to your main website admin panel page, just copy the codes which are between the html comment tag that says "Code Begins Here" and "Code Ends Here" to the body section of your main website admin panel page and copy the three links at the head section of this index.php page to the head section of your own main website admin panel page and you are done with this page.

It is very important that you read all the comments i have written in the scripts to understand how the system actually works.

Wednesday, 3 July 2013

Contact Form with Captcha using Ajax, Jquery and PHP

This tutorial is an enhancement of our old tutorial on the topic "Simple PHP Anti-Spam Captcha Contact Form Submission" and it teaches you how to create and add a simple but powerful Anti-Spam Captcha to your system or application using Ajax, Jquery and PHP.

A good way to avoid automatic form submissions when creating a web form or to prevent automated web robot tools and spammers from taking advantage of your forms and scripts is to use some kind of verification process.

One of the best ways is to use an image verification also known as Captcha. What it does is to dynamically create an image with a random string displayed on it. Then visitors or users of your website are asked to type that string in a text field and once the form is submitted, it checks if the string on the image matches the one inputted by the user.

Because there is no easy way to read a text from an image (image recognition) this is a good way to protect your web forms from spammers.

The system is very easy to understand and customize with good programming code comments to ease usability.

Click here to view this tutorial


Sunday, 16 June 2013

School Management System - Preview

The essence of Vasplus Programming Blog is to impact knowledge therefore, Schools, Colleges or Universities can not be left out.

We are currently designing a system called School Management System. This system will help to improve the performance and the entire system of Schools, Colleges or Universities all over the world.

Some features of the system includes

(1) Admission
(2) Students, Staff, Registrar and Admins Accounts Management
(3) Library
(4) Attendance
(5) Timetable
(6) Examination
(7) Hostel
(8) Departments
(9) News Update
(10) Messaging System
(11) New Users who intend to be students or staff of the school can pre-register but with a limited access right when logged in to ease the registration process for the school as the information to key into the system for new users are much
(12) A powerful Search Engine similar to the new Facebook Big Search Box design and much more

Please feel to suggest additional features you think we can add to this system to make it one of the best on the internet via the comment section at the bottom of this page or you can directly email us via our contact page on this website.

At Vasplus Programming Blog, we always want to give the best.

If you check very well on this website, you will see that almost all our scripts are free.
This one is not going to be a free application because it is a very big system, we pay heavily to keep this website running, we pay heavily for internet services, The computers used for designing this system were bought with money, Manpower is also involve with a lot of resources.

We are sure you all understand. We will do everything to get the system installed on your server or even buy you a domain plus hosting service depending on what you want.

The system will be ready around the end of this month or earlier next month.

We will be expecting your suggestions and feedbacks.

Thank You!
Vasplus Team.


School Management System - Preview


Website

Tuesday, 28 May 2013

Fancy Multiple File Upload using Ajax, Jquery and PHP

This tutorial helps and teaches you how to design a simple but powerful multiple file upload application with an option to remove unwanted added file or files using Ajax, Jquery and PHP.

To add or upload a file or files, simply click on the Browse File Button which is shown at the Live Demo page for this tutorial, select the file or multiple files that you wish to add or upload and your selected file or files will be added automatically to the files ready for upload section.

When you add a file to the files ready for upload section, the name of your added file or files, their sizes and date last modified will be show for each of the files.

After your files have been added to the files ready for upload section, there is an option for you to remove an unwanted file or files and finally click on the Upload Button to start uploading your added files.

You can add or upload as many files as possible without any file restriction. To add restriction such as file type or file size limit to the system, simply un-comment these features which are in the PHP File for this application.

Also, if you wish to save the names of the files which are uploaded and saved in a directory on your server in a database, simply un-comment the Database Scripts which are in the PHP file for this application.

The system supports all modern browsers and the scripts are written in a way that any one can easily understand and customize with good programming code comments to ease usability.


Select Multiple Files


Start Uploading Multiple Files Selected

Click here to view this tutorial


Friday, 24 May 2013

Play, Pause, Maximize and Restore Video File using PHP and Jquery


This tutorial teaches you how to create a very simple but powerful video player application using PHP, CSS and Jquery.

This is a very simple application that uses the play() and pause() functions to play and pause a video file and uses the hide() and show() functions to hide and display the play and pause buttons of the video with the help of CSS.

The programs are written in a way that any one can easily understand and customize without much effort and with good programming code comments to ease usability.

To fully understand what is happening or how the application works, please read the comments written in the scripts properly and where necessary.

There is no special form of configuration needed to install the system on your server. Just download the script, upload and extract the zipped folder to your server and you are done.


Tuesday, 21 May 2013

Private Messaging System v5 similar to Facebook using Ajax, Jquery and PHP


This tutorial helps and teaches you how to build a simple but powerful Private Messaging System which is similar to that of Facebook with amazing features such as the following:

(1) Log-in System.

(2) Option to Compose and Send New Messages.

(3) Option to search for a desired user or friend for messaging purpose.

(4) Displaying of users in the system which could also be referred to as Friends List.

(5) Sending of messages without page refresh.

(6) Displaying of newly sent message(s) without page refresh.

(7) Show short titles or descriptions for sent and received messages - similar to Facebook,

(8) Show sent and received message status such as (Read or Unread) - similar to Facebook,

(9) Set current user or friend communicating with to selected even when the page is reloaded - similar to Facebook.

(10) File attachments with File Identification.

(11) Download attached files with photo enlargement - similar to Facebook.

(12) Hide and show send message button - similar to Facebook.

(13) Press enter key to send messages - similar to Facebook.

 (14) View all conversations had with friends or users.

(15) Nice view of date and time messages are or were sent.

(16) Delete messages without page refresh.

(17) Nice confirmation box for message deletion and log out, etc.

The system supports all browsers and the script is written in a way that any one can easily understand and customize with good programming code comments to ease usability.

To disable the current log-in for this system so as to use your existing log-in systems, just create a cookie session with the following variables:

Below is a JQuery Code Example but you can as well do it with PHP depending on what you prefer.

$.cookie('session_username', 'Logged-in session username goes in here');
$.cookie('session_fullname', 'Logged-in session fullname goes in here');
$.cookie('friends_username', 'Logged-in session username goes in here again');
$.cookie('friends_fullname', 'Logged-in session fullname goes in here again');

That's all. Once you have created the cookie session with the above variables during the log-in process of your existing system, the page where the private message system is placed will not prompt for a second log-in again and the system will as well identify the logged-in user.

------------------------------------------------------------------------      SCREEN SHOTS     ------------------------------------------------------------------------

Private Messaging System v5 similar to Facebook using Ajax, Jquery and PHP


Private Messaging System v5 similar to Facebook using Ajax, Jquery and PHP


Private Messaging System v5 similar to Facebook using Ajax, Jquery and PHP


Private Messaging System v5 similar to Facebook using Ajax, Jquery and PHP


Private Messaging System v5 similar to Facebook using Ajax, Jquery and PHP


Private Messaging System v5 similar to Facebook using Ajax, Jquery and PHP


Private Messaging System v5 similar to Facebook using Ajax, Jquery and PHP


Private Messaging System v5 similar to Facebook using Ajax, Jquery and PHP


Private Messaging System v5 similar to Facebook using Ajax, Jquery and PHP


Wednesday, 15 May 2013

Wall Script Version 7.0


This amazing script is a user friendly application which is similar to that of Facebook and Google Plus with more advanced features and the script is very easy to install and customize.

The script comprises of the following langauges: PHP, Jquery, Ajax, MySql database.

For more information about this application, please follow the below link:

URL: http://vasplus.info/index.php?wall_script=viewed#.UZQkUcrjuCY


Thursday, 11 April 2013

Easy Photo Viewer and Scroller using Jquery


This tutorial teaches you how to create an easy or a very simple but powerful photo viewer and scroller application using Jquery.

This is a very simple application that uses the hide() and fadeIn() functions to display and scroll the images or contents in a gallery and the programs are written in a way that any one can easily understand and customize without much effort and with good programming code comments to ease usability.

To fully understand what is happening or how the application works, please read the comments written in the scripts properly where necessary.

There is no special form of configuration needed to install the system on your server. Just download the script, upload and extract the zipped folder to your server and you are done.


Comment System Using Ajax, Jquery and PHP - Updated v5.0


This tutorial teaches you how to build a Simple but powerful and User Friendly Comment System whereby the users of your websites can easily post their comments or replies on your updates or other information on your website using Ajax, Jquery and PHP.

The comment system uses cookie to store users information on their first time to post a comment, reply to a posted comment or like a comment and these stored information are later saved in the database as the login information for your users.

For a user to leave or post a comment, reply to a posted comment or like a comment, the system will prompt the user to enter his or her Full name and Email Address for identification purpose.

The system uses the email addresses submitted by users at their first time to post a comment, reply to a posted comment or like a comment to identify them whenever they try to perform any further action in the future and as such, users email addresses are unique within the system.

Below are some features of the comment system:

(1) Good in security
(2) Users can add their avatar or desired photo for commenting purpose
(3) Enlarge users avatar or photos when clicked on them
(4) Reply to posted comments
(5) Like both comments and replies posted
(6) Email notification for new Replies and Likes to users concerned
(7) Nice display of Confirmation Box for comment deletion and logout
(8) Proper validation for empty fields
(9) Comments are displayed based on pages where they are posted
(10) No long URLs or contents that extends through the comments box area.
(11) Load more Comments and Replies Button with pagination
(12) Admins can moderate comments by deleting unwanted comments and much more.
This powerful comment system supports all browsers and programming languages used are Ajax, Jquery and PHP.

The script is very easy to understand and customize with good programming code comments to ease usability.


Secure Forgot Password System Using Ajax, Jquery and PHP


This tutorial teaches you how to build a secure forgot password system or a complete login system with the forgot password feature without refreshing your website page using Ajax, Jquery and PHP.

This system is secure in the sense that, the users of your website have been given the privilege to set their private security questions and answers during their account creation process that they will later use, should they forget or lost their account passwords.

If a user of your website happens to lost or forget his account password, that user does not need to request for a new random generated password sent via his or her email box which is not secure because an attacker can intercept such messages and therefore gain access to the account of your user(s).

What this system does is to allow your users to set their private or secret questions and answers during their account creation so that, if a user forgets his or her password, all the user will do is to come to the login page of your website and click on the forgot password button, the system will then prompt the user to enter his or her account username.

After the user has provided his or her account username and clicks on the submit button, the system will now validate the submitted username to be sure that its valid and gets the secret question associated with the submitted username from the database for the user to answer it.

If the user answers the secret question correctly, access to change the password that is associated with the submitted username account will be given to this user otherwise this user will be denied access.

Users are given 6 chances to enter correct answer for their security questions during their reset password process after which the system will lock a user out for 30 minutes, should the user submit wrong security answer up to six times.

The system supports all browsers and the scripts are written in a way that any one can easily understand and customize with good programming code comments to ease usability.


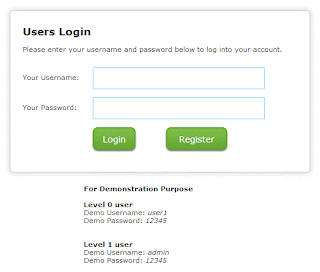
Secured Users Access Level System using PHP and Mysql


This tutorial teaches you how to build a secure user access level system using PHP and Mysql.

There are two user access levels created for this system at the moment but you can add as many user levels as you wish depending on your needs.

The two user access levels created for this system at the moment are as follows:

(1) Level Zero: This is the default level meant for all ordinary and newly registered users in the system. When a user newly registers, the access level for that user is set to zero in the database users table.
(2) Level One: This is the default level meant for the Administrator of the system. You have to set the access level for any user that you wish to make an administrator for the system to one in the database users table before that user can have the administrative access or privilege to see all the information in the system.

When a user tries to log into the system, the system validates his or her information, checks the database users table for his or her details including his or her access level and displays the appropriate content to the user.

An ordinary user or a user at a lower level in the system does not and can not see what the administrator who is at an upper level in the system sees.

The levels of the users in the system are determined based on the information inserted into the database table for each user.

This is a very simple to understand application that gives you the basics of how to implement this kind of systems with good programming code comments to ease usability.


Tuesday, 5 March 2013

Send Friend Request, Accept or Decline Request using Ajax, Jquery and PHP


This tutorial teaches you how to build a system whereby the users in your system can send friend request to other users in the system, those users who have been sent friend request have the options to accept or decline request sent to them depending on their choice of action using Ajax, Jquery and PHP.

This system works with MySql database and comprises of three tables.

The first table is where the details of the users in the system are stored and retrieved during Sign-up and Login process.
The second table is where the details of the users who are confirmed as friends are stored for friendship purpose.
The third table is where the details of every sent friend request are stored waiting for an acceptance or rejection by the user who the request was sent.

When a user sends a friend request by clicking on the Add as Friend button, this button will automatically change to Request Sent on successful sending of the request with an option to Cancel the sent request in case the user who sent the request wishes to stop the request.

Once a user who has been sent a friend request logs into the system or accesses the system, a notification for the request will be shown to this user from the top of the page with options to Accept the sent request or Decline the request depending on the user's choice of action.

If the user who has been sent a friend request chooses to accept the request, the request will be deleted from the Friends Request table and be stored in the Confirmed Friends table and both the user who sent the request and the user who the request was sent to will now see each other in their friends list.

If a user who has been sent a friend request chooses to decline the request, the request will be deleted from the Friends Request table and that ends the story. No further action is or will be taken.

This is a very simple to understand application that gives you the basics of how to implement this kind of systems with good programming code comments to ease usability.


Click here to view this tutorial


Saturday, 2 March 2013

Upload and Watermark Image Files without Refreshing Page using Ajax and Jquery


This tutorial teaches you how to upload and watermark or stamp image files with your desired content without refreshing your website page using Ajax, Jquery and PHP.

To upload and watermark an image file, simply click on the Attach File button, select the file that you wish to upload and finally click on the submit button and your file will be uploaded, watermarked or stamped and displayed on your screen provided the file is a gif, jpg, jpeg or png image file which are the allowed image files for this demonstration.

The system supports all browsers and the script is very easy to understand and customize with proper programming code comments to ease usability.

No form of configuration is required to use or install the system on your server.

Just open the directory named images which is in the downloaded and extracted directory and change the file named www_dot_vasplus_dot_info.png to your own image file for watermark and that's it.


File System using Ajax, Jquery and PHP v4.0


What is a File System?
A file system is a complete directory structure, including a root directory and any sub-directories and files beneath it.

This tutorial teaches you how to build an advanced File System whereby you can easily upload files and manage all the files on your server without refreshing your website page using Ajax, Jquery and PHP.

This is a very simple to understand application because the system itself is user friendly, all you need to do in order to use the system are properly explained and the scripts are well commented to ease usability.

No configuration is required to install and use the system on your server. All you need to do is to download the script, upload and extract the downloaded folder to your server and you are done to start using the system.

This system is made up of two files and a directory which are as follows: default_system_index.php, default_system_actions.php and a directory named default_system_files that contains the JavaScript Files, a CSS File and the images used in the application.

All other directories and files in the zipped downloaded folder are just example files and directories on your server which has been placed for demonstration purpose.

File System v4.1 is available for sale upon request.


Pagination System using Ajax, Jquery and PHP


This tutorial teaches you how to build a powerful pagination system with the help of Ajax, Jquery and PHP without having to refresh your website page while loading contents from your database or an external file.

This is a very simple to understand scripts as it only has few lines of code with programming comments to ease usability.

If you experience any difficulty using the script, do not hesitate to post it in the comment section at the bottom of this tutorial.


Friday, 8 February 2013

Nice Pop-up Box with scroll-bar using JavaScript and CSS


This tutorial teaches you how to create a simple but powerful Pop-up Box with scroll-bar using JavaScript and CSS.

This application is similar to our previous tutorial titled Fancy Sign-up and Login Pop-up Boxes using CSS and Jquery but the difference is that, this one uses only JavaScript without Jquery.

In this tutorial, the power of JavaScript is demonstrated with few lines of code.

The system supports all browsers and the scripts are easy to understand and customize with good use of programming code comments to ease usability.

No configuration is required to install the system on your server.


Click here to view this tutorial

Tuesday, 5 February 2013

Auto News Scroller using Ajax, Jquery and PHP


This tutorial teaches you how to create a simple but powerful Auto News or Content Scroller using Ajax, Jquery and PHP.

The system uses the Mouse-enter and Mouse-leave Events to Play and Pause the scrolling of the items or contents.

This is a very simple to understand application as the scripts are well commented to ease usability.


Monday, 4 February 2013

Simple PHP Anti-Spam Captcha Contact Form Submission


This tutorial teaches you how to create and add a simple but powerful Anti-Spam Captcha to your system or application using PHP.

A good way to avoid automatic form submissions when creating a web form or to prevent automated web robot tools and spammers from taking advantage of your forms and scripts is to use some kind of verification process.

One of the best ways is to use an image verification also known as Captcha. What it does is to dynamically create an image with a random string displayed on it. Then visitors or users of your website are asked to type that string in a text field and once the form is submitted, it checks if the string on the image matches the one inputted by the user.

Because there is no easy way to read a text from an image (image recognition) this is a good way to protect your web forms from spammers.

The system is very easy to understand and customize with good programming code comments to ease usability.


Click here to view this tutorial